Wood turning is one of the ancient wood-crafting processes that has been embraced even in modern times. This fashioning process is done to craft wood into various shapes utilizing a lathe and handheld tools. Learn how to do this yourself with this step by step bowl turning basics for beginners guide.
Bowl turning is one of the most enjoyable and addictive processes in wood turning. Bowl turning method involves turning wood with its surface grains perpendicular to the lathe bed.
You will find a wooden bowl more satisfying and pleasing to use than any other utensil. Compared to most woodworking projects, turning a bowl is more cost-effective and time-efficient. If you want to recycle that piece of wood that you could otherwise discard, turn it into a bowl. If you don’t know the tools to use or the method to follow in bowl turning, here is a detailed guide.
Materials needed for this project
Timber blanks
Typically any wood can be turned into a bowl. However, to craft a good wood bowl, you need to choose a close-grained and dense wood blank. Oak and walnut woods are the common types used to make wooden bowls. If you choose freshly cut wood, you will enjoy the advantage of easier cutting and turning, but the wood may suffer from cracks if it dries quickly. You may, however, prevent this by wrapping the turned bowl with a plastic bag at its initial stages of drying. Although pre-dried wood is relatively harder to turn, it is recommended due to is stability to cracking.
If you choose softwood for your project, you will have to deal with the dulling of tools that occur very quickly. A little more care is also needed since softwoods are prone to easy gauging even on slight errors in turning. Turning softwoods also results in weaker and less dense bowls. Using hardwoods for your bowl project solves all these issues. If you are going to obtain pre-treated wood from a wood store, you should make sure that the pieces are not overpriced since a bowl turning project should be very budget friendly.
Finishes
For any woodworking project, it is obvious that you want to add that extra protection and enhance the rustic beauty of the wood you are using. There are options of wood finishes to choose from. If you want to keep the look of your bowl simple, apply wood oils or clear paints. If your project is aimed at creating an intense artistic expression, choose paints and stain but only focus on the outer surface of the bowl. You should make sure that you purchase your wood finishes in the same place you buy your woods as they will advise you on the right finishes to use for that particular wood.
Bowl turning tools
Lathe and holding devices
A Lathe is a fixed machine with moving parts that rotate about a horizontal axis, shaping wood blanks into different shapes. The machine was developed to minimize the energy and time needed for wood turning. The headstock of a lathe has spurs that are driven into the wood, supporting it and collecting cups to hold wood shavings and tenons produced by the turning process. In bowl turning projects, a faceplate is mounted on the headstock spindle to enable the holding of a wider wood surface area. A tailstock is used to offer extra support to the turning timber plank.
If you want your bowl turning to be successful, you must secure a lathe. The beauty of this machine is its versatility that enables you to create other round wood pieces after exhausting all wood bowl designs. A lathe not only helps to turn wood pieces but also simplifies the process of sanding and applying finishes. Modern lathe machines are portable, ensuring flexibility, especially if you want to turn your wood from the wood source point.
Handheld bowl turning tools
These are materials that are used to bore into the wood and shape it into the required design. You must know how to use and maintain these tools to make sure they serve you for long. Your woodworking toolkit must not be full, especially if you are starting out. You can start with the basic tools and then add others later. Most wood turning tools are made of high-speed steel to maintain sharp cutting edges and to withstand the stronger forces created. The basic tools you need to turn a wood bowl include:
Roughing gouge
This tool is required in the initial stages of a bowl turning project. A roughing gouge is relatively wide, heavy. These features make the tool suitable in clearing most of the center material quickly and also rough the outside of the bowl. A sweptback version does the mass clearing work faster.
Bowl gouge
The tool is similar to the roughing gauge but has a more extended handle that supports the turning of larger bowls. Its thick and robust gauge helps deal with forces from these wider bowls. This gouge features a round or parabolic flute making it the recommended gouge to be used for clearing masses of large bowls
A detail gouge
A detail gouge is a smaller bowl gouge used to make smoother and finer cuts. The gouge is used for finishing purposes of the bowl. Choose a sweptback version for this tool as well fastens the finishing process.
A wood bowl scraper
Scrapers help you maneuver easily in tight bowl corners that are often found on the inner surface of the bowl. A round-bottomed scraper is recommended as it provides better control of the scraping process. The scraper should be dull to ensure that you don’t cut the wood while scrapping.
Power drill and cutting tools
These tools are used to precut and predrill your wood pieces before mounting on the lathe. This reduces the amount of work you will do on the lathe.
The above are the essential tools that you need for your bowl turning project. Any other tool that you may find necessary for your project is just a variation of the above tools.
Maintenance processes for your woodturning tools include regular sharpening of cutting tools, oiling of moving parts of the lathe and storage of all these equipment in a cool and dry place to prevent rusting. If your tools are not totally functioning, you should focus on replacing them.
Before you start your bowl turning project, you should be aware of the following wood turning safety measures:
Only use lathe tools for bowl turning.
In this project, avoid modifying other tools to replace the essential tools. This may lead to accidents or unnecessary damage on your wood blanks as the process involves high speed.
Fasten the wood firmly on the lathe
Before turning on the machine, you should ensure that the wood is tightly held by the spindle and tailstock to prevent it from being thrown to you. In the initial stage of bowl turning, you should use slower rotation speeds.
Provide enough rotation space for your piece
If you are primarily working on larger bowls, you ensure that the rotation circumference is catered for, to prevent hitting things around.
Wear protective clothing
Use a dust respirator, full face shield to protect the delicate parts of your face such as the eyes and nose. You may also wear gloves to protect your hands from the rough tool handles.
With that said, you are now ready for your project.
Bowl turning method (A Step-wise Guide)
STEP 1: Prepare the selected blank
In this stage, cut your wood into square or circular pieces, remove the bark and loose knots on your pieces. You should also establish the center point of your cut pieces. Draw an â€X’ from the corners of the square pieces and take the meeting point as the center. Use a woodwork compass to trace carefully on the piece ends, a circle and then take the radius inner end as the center. Drill a starter hole at the centerpiece you established, on the wood piece surface that you will drill out. Remove any materials outside the circle that you traced.
STEP 2: Mount the circular blank
Install the lathe wood screw in the wood blank. If you are confident that the wood is centered, lock the spindle then hold the predrilled hole in against the screw. Adjust the tailstock to the other side and close the tailstock base. To ensure that the blank is firmly attached, turn the tailstock crank and tighten it. Insert the tip of the tailstock into the center hole on the other side. Set a workable lathe height and the tool rest in a reachable position.
STEP 3: Round the sides of the blank
Use low speed and a bowl gouge to round the mounted blank. Start with the high spot then move to the lower spots. You should keep changing the position of the tool rest as the wood is cut away. Bowl shaping should as early as in this rounding step.
STEP 4: Shape the bottom
Depending on preference, shape the bottom either flat or round using a roughing gouge and a wood scraper. Make sure that your bowl is tightly secured on the chuck when shaping. Increase the speed slightly when shaping the bowl.
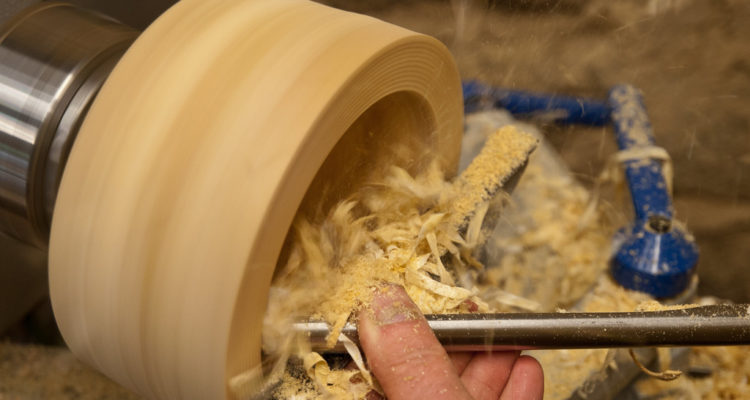
STEP 5: Hollow the inside
When you are done with shaping the outer surface of the bowl, begin hollowing the piece from the center point on the other side. Concentrate on making the bottom flat and the sides straight throughout the first few minutes of hollowing. Avoid taking deeper cuts when hollowing, as this may lead to unexpected dents on your developing bowl. You should hollow the piece until you achieve the required depth and thickness. Proceed to finer cuts using a detail gouge to make the final size and shape of your wood bowl. If you don’t get the required shape, repeat the method with another piece of wood other before proceeding to the finishing step.
STEP 6: Finishing
Note: Performing finishing on the lathe is very dangerous. You should be extra cautious when sanding or applying paint while the spindle is rotating.
The safe method of smoothening your wood is by using sandpaper mounted on a sanding block with a long handle. Spray painting is also recommended if you want to apply your finishes when the bowl is rotating. To reduce these uncommon and unsafe processes, unmount your bowl and finish it away from the lathe bench.
If you want to become an experienced bowl turner, you must be ready to craft several bowls. Knowing how to make perfects cuts and scraps is not a one attempt hustle. Once you get used to bowl turning, nothing will stop you from making several pieces in a day. If you have the right tools and a lathe, you should start turning pieces of wood in your backyard into nice-looking bowls.
No Comments