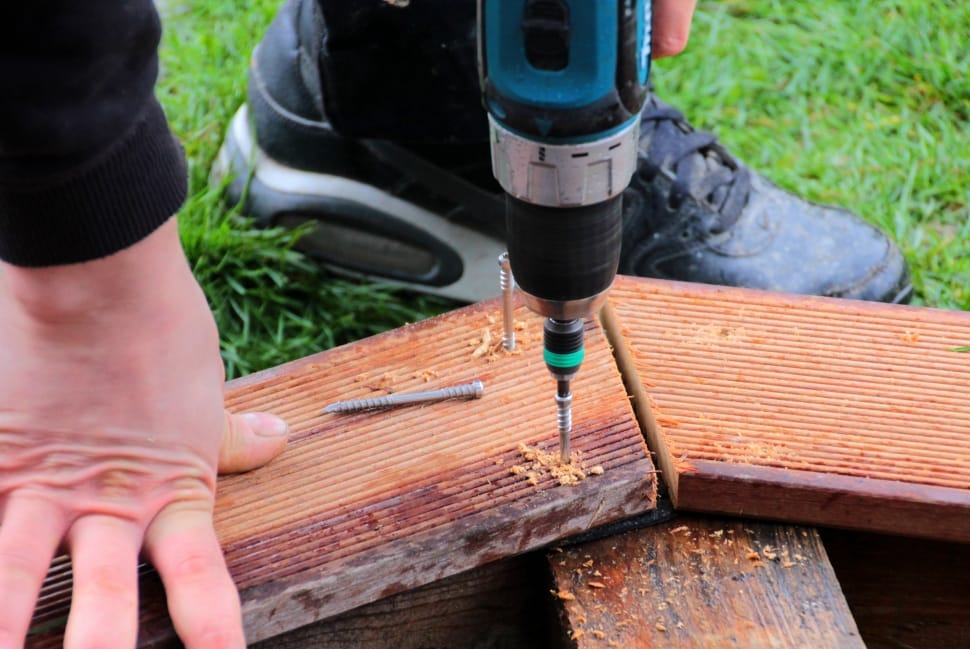
Do you want to save on the money you spend on your woodworking projects? If the answer is yes, you must be ready to maximize the use of the woodworking tools that you already have. One such tool that can be used for more than one purpose is the woodworking drill. In this article I will explain how to use a power drill as a screwdriver.
Although its primary purpose is drilling holes on surfaces such as wood, you can still use it to drive your screws. To make use of this versatile tool as a screwdriver, you must be aware of the bits to use, settings involved and the techniques for a smooth driving task. Below is a complete guide explaining these aspects to make you understand how to use a drill as a screwdriver.
Screw bits
This is the main accessory you have to acquire if you want to use a drill for driving screws. The shape of your screw heads must be known if you want to know the right bit to fit them. The most common screw head shape is the star head. This type of screw requires a star head driver bit.
Other screws used for woodworking projects include the hexagon head-shaped screws, roofing screws, the bugle head butten screws and the flat head screws. These screws require the hexagon tipped bit, nut setter hex bit, internal hex drive bit and the flat drive bit respectively.
Other than the shape, the size of the screw head must also be reflected in the screw bit that you choose. You should only use the correct bits for you screws to minimize slipping that may damage the screw head or the wood you are working on.
Drill settings required for Screwdriving
The two main settings that come with a drill are the action setting and the torque setting.
Action setting
Many drills come with three action settings; a drill bit, a hammer and a screw. Related pictures on the surface represent all these right below the drill head. The action setting required for driving screws is the screw setting. To set it, rotate the drill head until the screw picture aligns to the triangular pointer.
Although the power of drilling can be configured in the torque setting, the action setting makes sure that the rotation speed of the bit is within range to handle screwing. If you are done with your screw driving task, it is better to set the drill to its regular action of drilling before storage.
Torque setting
In screw driving, torque is the force required to make a screwing bit rotate about a horizontal or vertical axis. The torque setting, especially in woodworking, helps you make the correct screwing when dealing with materials of varying hardness.
Harder materials require high torque, while softer materials require low torque. The torque setting is represented by whole numbers on an adjustable collar just below the action setting surface.
Higher numbers represent more torque, while smaller numbers represent less torque. Poor torque setting can lead to overdriving. If this is the first time you are going to use the drill for screw driving, it is advisable first to test the torque you will need with a scrap wood of the same origin as the principal wood you want to screw.
How to use a drill for screw driving (A step-wise guide)
1) Forward screwing
This is driving the screws into the wood for joining purposes. This technique is preferred as it offers better and firm wood joining than it is for nailing and glueing. In this guide, we will first understand how to work on regular threaded screws.
Select a bit for your drill
Follow the guide on the screw bit section to choose the best drill bit for your screw driving task.
Connect the bit to the drill
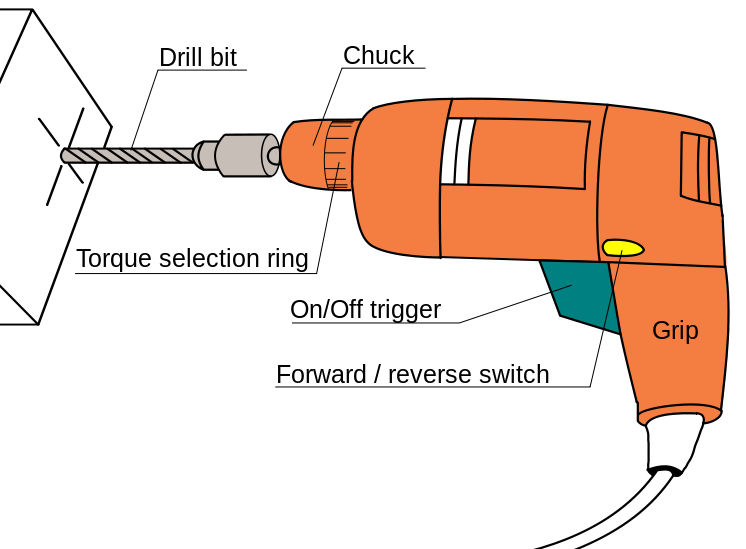
To understand how to connect a screwing bit to a drill successfully, let us first learn the parts of a powered drill:

· Trigger switch– This is an on-off mechanism that powers on or off the drill.
· Power source– The drill you will use may either be powered by a battery that requires recharging or an electric source that means your drill must be corded. Electric powered drills offer more power than battery-powered drills.
- Forward-reverse switch– The forward setting is for screwing in while the reverse setting is for screwing out.
- Chuck key– A chuck key is used to tighten the grip of the screwing bit on the drill chuck.
- Drill shaft– A shaft is a pointed part used to hold the drill chuck and the drill motor. The rotation clutch of the drill is also located in the shaft.
· Drill chuck– This is the part where the bit is attached and tightened. The chuck is adjustable to handle any bit size.
Attach the bit to the drill chuck and then tighten it with a chuck key. If your drill chuck is keyless, you should use your hands to tighten the bit. Inadequate tightening of the bit can cause loosening as you drive your screws
Set the drill for forward drilling
This should be done from the forward-reverse switch discussed above. With forward drilling, the bit turns in a clockwise direction pushing the screw into the wood.
Have a nice grip of the drill
This is a high-speed tool that extends the turning resistance to the user. You must, therefore, hold the drill firmly to avoid the drill being thrown to you as you drive the screws. A firm grip also ensures that you are in control of the screw driving, reducing slipping leading to quality driving of the screws.
Place the bit tip on the head of the screw
If you are a beginner in this task, you will most likely experience slips that damage the wood or the screw head before the screwing is over. This happens if the bit tip is not positioned in the screw head slot correctly and pressed firmly.
You should, therefore, make sure that the bit is tightly secured on the screw head. If the bit still slips off, it is advisable first to stop the drill and then reposition it again on the screw head.
Power on the drill
To drive the screw into the wood, press the trigger button to be on the ON position. The drill will start rotating, turning the screw into the wood. While it is advisable to use high speed for harder woods, it is better to start with lower torque and increase it when the driving has commenced.
Screw driving can be done up to a 1/8” below the wood surface for general woodworking projects, or in alignment with the wood surface if you are working on furniture surfaces that you don’t want to leave screw dents on.
2) Reverse screwing
Reverse screwing is a process done when you want to remove screws from wood, especially when you want to conduct a makeover on your wooden accessories. Reverse screwing can also be done when you want to replace the previously used screws with better ones for extra support.
The process is similar to the forward screwing just that you will set the drill for reverse screwing in the forward-reverse switch. This action rotates the drill in a counterclockwise direction, pulling out the normal threaded screws out of the wood.
But Beware..
If your drill is rotating when you want to change the setting, you should power off the drill, then press the trigger to the other side. Changing the forward-reverse setting when the drill is rotating can cause breakage of your drills.
What if you are using reverse threaded screws?
A reverse threaded screw, also known as a left-handed threads screw when compared to a regular threaded screw, operates oppositely. Reverse screwing is used to drive these screws into the wood while forward screwing removes reverse threaded screws from the wood. Due to the confusion these screws bring, it is better to stick to the normal threaded screws for your joining work.
Tips to use in this task
- Use long enough screws. Since a powered drill can handle any screw size, you should use a screw that will hold your two wooden pieces firmly.
- Predrill wood before screwing. If you want to make the screw driving work easier, you should make a clearance hole on the wood you are working on. Make sure that the hole has the same circumference as the screw you will use. The beauty of using a drill is that by just changing the bit and changing the action setting, you will have the predrilling work done.
- Use magnetic bit tips. Since screws are metallic, magnetic tips will hold the screws firmly making it easier to drive the screws in or out of wood.
- Make a pilot hole. If you want your screw to penetrate to the other side of the wood, you should make a hole on the opposite side to make sure that there is no cracking as the screw goes through the wood.
To conclude
Using a drill for screw driving makes not only sure that its uses are maximized hence saving you on the money you could use in acquiring screwdrivers but also makes sure that the screw driving task is done faster and with minimum energy. Always make sure that you have the correct settings on the drill before starting your screw driving work.
I really hope you learned a lot with this guide on how to use a power drill as a screwdriver. In case you are just starting out with woodworking, you should really check out my in-depth woodworking guide.

No Comments